Friday, 31 August 2012
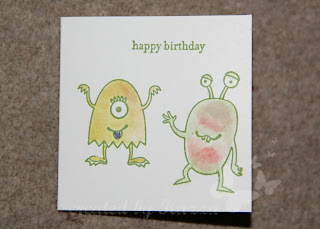
Happy Birthday
Another birthday card to share today. This one was for my Mother in Law who was 82 a few days ago.
The stamped image is from Apothecary Art, cut out using the matching framelit dies, the greeting was coloured using a marker pen.
The Everyday Enchantment designer paper is now retired but i thought it was one that she would like.
Speaking of retirement, it won't be long before we get the new Stampin up catalogue (on 1st October) which means that tomorrow we will hear what is to be discontinued from the current catalogue. There are sure to be some favourites retiring but how exciting to be getting some new products!
Also tomorrow is the launch of the new Autumn and Winter catalogue which will run until the end of January. There are some gorgeous products in there which I hope you will love as much as I do, my wish list is so long!
If you would like a copy of the new catalogue then please shout and if you would like to host a workshop or to attend a class or club then you can email me.
Wednesday, 29 August 2012
Little monster
Goodness, where is this year going?! Almost the end of August already, the kids will be back to school next week and then it's all downhill to Christmas :/
I made today's card a few days ago, it's for the son of one of my best friends and sadly because we were on holiday he is going to receive his present late this year :(
The stamp set is Build a Monster, it's a great set as all the monster parts are separate stamps so you can create loads of different monsters! I coloured them using a blender pen and the ink from the lid of my inkpads.
Saturday, 25 August 2012
Another Christmas Gift box
Friday, 24 August 2012
Just Believe
This stamp set has been available for a while but it is a recent acquisition for me, I do love the silhouette images. I wanted to make use of the 2010-12 In colours while we still have them, they retire at the end of September, so this is a combination using Pear Pizazz and Concord Crush.
I used lots of layers on the front of this card which meant that it was very heavy so to counter that I added a couple of layers to the inside!
Of course I then had to stamp a coordinating image on the inside too but here is where I had a disaster! When I mounted my stamps onto the wooden blocks I had inadvertantly stuck one upside down to the image label on the reverse side which means that I stamped it upside down! Now I could have turned over and used the emergency side but after remounting my stamp I decided to stamp again in the opposite corner. It still leaves lots of room for writing :)
Labels:
Card,
Concord Crush,
Just Believe,
Pear Pizazz,
pearls
Wednesday, 22 August 2012
Dinoroar!
What do you think of this little cutie? I thought I would have a downsizing moment for a change, I rarely use the mini envelopes but for a child's card they can be just the ticket, this is a 3x3 inch card.
The image is from the very cute Dinoroar stamp set which I "watercoloured" using a blender pen and taking the ink from the lid of my inkpads.
Monday, 20 August 2012
Flight of the Butterfly
Does this look familiar? It's a new take on the thank you card that I made for Alice to send after her birthday, you can see the original post here.
I redesigned it slightly to use for Make, Do and Send card club at the beginning of August, if you would like to join us please check out the details on my monthly clubs page.
I really love the Twitterpated designer paper that we have in the Summer mini catalogue, we only have it until the end of the month and I will be sad to see it go so I;m making the most of it now. so the paper gave me the colour pallette for the rest of the card; the butterfly is 3d mounted to look as though it has just landed and I used a dauber around the edge to give it more definition. A detail that I added to this version is the paper pricking in the top right and bottom right corners, I think you can just see it in the photo.
Sunday, 19 August 2012
Christmas Card
Now this is clever! This card and it's matching envelope are made from one 12x12 piece of card and designer series paper and the Simply Scored board. The really clever part however is the closure.
The card stays closed because of the heart shapes that are attached to each corner. They overlap where they meet in the centre.
SO clever! and much easier to make than it looks. The inside and outside of the card has been decorated with Holly Berry dsp.
Friday, 17 August 2012
Christmas Wreath card
I'm going to make a few of these this Christmas! Such an effective design but really easy to create. The white base was embossed in the Big Shot with the striped embossing folder and gives a great base to "hang" the wreath. The wreath was made by punching a ring of card from two different sized circle punches and then a length of ruffled ribbon wrapped around. A tiny red faux bow finishes it off. The greeting is from the Contempo Christmas stamp set, a couple of glimmer brads to complete.
Thursday, 16 August 2012
Such a proud Mummy!
No card to share with you today I'm afraid but I have some very special news instead!
Today is 'A' level results day and we have been patiently waiting to see if Alice got the necessary results from all of her hard work to enable her to take up a place at university. She only went and did it!! An incredible achievement when you consider the year that we have had. Alice worked so hard against all the odds and it paid off, she is off to Newport in Wales in a few weeks for a BA hons course in Film and Video; she wants to pursue a career in post production.
So, you can understand why I am a very proud mummy today and I hope you will join me in congratulating her.
Do you think it is too early to begin shopping for an Oscars dress? :)
Wednesday, 15 August 2012
Christmas Ribbon Wreath
Another team training project but a deviation from the usual cards! This Christmas wreath uses nearly a whole reel of lucky limeade ruffled ribbon wrapped around a polystyrene ring and held with glue dots. I think the poinsettias are great too and so simple to make using the five petal punch, the boho blossoms punch and a glimmer brad.
I have more projects to share with you but as it is A level results day tomorrow I am not sure I will make it here.
Tuesday, 14 August 2012
Christmas Elf Boots!
How is this for a cheeky Christmas card? A pair of stripy stockinged Elfen legs. I made this card at quarterly team training along with the gift box and I have a few more projects to share over the next few days so prepare to feel unseasonably Christmassy!
The shoes have each been made from a quarter of a top note die which was then shaped further using the ornament and circle punches, the shoes were then topped with a glimmer brad and a bow. The gorgeous stripy stockings are from the Holly Berry designer papers and the greeting from Petite Pairs.
Sunday, 12 August 2012
Christmas Gift Box
I love this box! The lovely Amanda Fowler showed us how at our recent team training day at the end of July.
The box itself is made from just one piece of A4 card stock and created easily using the Simply Scored. The lid is made from a scallop square cut using the Big Shot.
The completed box stands around 6 inches high and will be perfect at Christmas time, I can see that I will be making a lot of these.
Saturday, 11 August 2012
A Reason to Smile
It's Summer and there are plenty of reasons to smile at the moment. We have had some great weather recently and I'm crossing my fingers that there is more to come! Team GB have done so well at the Olympic Games and have given us loads of smiles too.
BUT Stampin Up have given us a wonderful Reason to Smile with this gorgeous stamp set that is only available during August. You can order it at a workshop or class OR you can receive it absolutely free with a purchase of £60! If you would like to add it to your collection then give me a shout.
Friday, 10 August 2012
Square scraps
This is a great way of using up some of those scraps of designer paper. I have used the Everyday enchantment designer paper which was on special offer last month. Just cut into squares and arranged on the front of my card, I then added a layered flower cut using the Big Shot.
To add some extra interest the bottom edge of the card is trimmed in line with the paper shapes
Wednesday, 8 August 2012
Beautiful Butterflies
You will find several versions of this card on various blogs, this is mine. My base card is the lovely deep purply blue Concord Crush upon which I have layered an embossed whisper white mat. The embossing folder is Elegant bouquet. The gorgeous butterflies, again in concord crush are created using the embosslits die which cuts and embosses the shapes at the same time. I just glued one half of the butterflies to the card so that it looks like they just landed for a moment.
Monday, 6 August 2012
Sail Away
Again, this card was case'd from another crafter and I apologise for not taking note of who it was. The Yacht image is stamped onto the smallest of 3 squares, all the edges daubed in matching ink and twisted and layered onto the base card. The sentiment is from the Curvy Verses stamp set on a punched decorative label.
Saturday, 4 August 2012
Christmas in the pink
All the projects I had to share with you from my crafty weekend away in Worthing mean I haven't yet shown you what we made at Make, Do and Send card club at the beginning of July!
Carrying on from where we left off, another Christmas card! Now that's two people who can have a card this year :)
This card is case'd from Elaine Smith, you can see her blog Sassy Stampers here. I hope you don't mind Elaine but I think this is such a great card.
The colour scheme is Pretty in Pink and Rich Razzleberry, I stamped the background with the Serene Snowflakes then added punched baubles. Some ribbon and a few rhinestones complete the front. The front edge is cut shorter than the back with a pretty scalloped edge so a complementary panel was added to the inside.
Thursday, 2 August 2012
Bookmark swaps
A couple of Saturday's ago was our Stampin Up teams Quarterly training day. When demonstrator's get together there is always lots of swapping of projects so that we can all gain inspiration from each other.
In case it isn't obvious, I made bookmarks this time. I made several different colourways as you can see above.
I used the scallop border punch to pretty up the edges and made rings using two of the circle punches to highlight my stamping.
Subscribe to:
Posts (Atom)