Showing posts with label Ribbon. Show all posts

Monday, 15 July 2013

Calypso Flower


Just a quick post from me today and it's back to the flowers! This image was coloured with marker pens so that I could get more than one colour on the image. Then the flower was stamped again and 3d mounted to give some dimension.

Thursday, 4 April 2013

Asymetric Gift card


Today's card is from a shoebox swap that was held at our recent team day.  I can't remember who provided this one, sorry, but it I find out then I will point you in her direction. 
It's a great way to present a gift card as the clever fold creates a pocket on the front and also on the inside of the card.  Of course, it can be made for absolutely any occasion and decorated as you please but in this case we used designer paper in coordinating colours, the border punch and the ribbon flowers.


Wednesday, 3 April 2013

All Dressed Up!


The card I am sharing today was designed by Amanda Fowler, you can see her blog here. I had the chance to make it at a team stamping day recently. 
The base card is cut using the oval scallop framelits and the big shot, part of the background layers has been embossed too, you can just about see it in this photo. The dress and stand are from the Dress it up framelit collection.  We attached the fabric to card before cutting out which makes it much neater. 

Monday, 1 April 2013

Happy Easter!


Happy Easter!  Yes I know it was yesterday but today is still a holiday right? Today I am sharing a little Easter basket and a card especially made for Spring, let's hope it is just around the corner at last.


Here's a closer look at the basket.  I ran the card through the textured embossing folder so that it looked a little more basket like.  The flowers are made using the boho blossom punch with dsp and card. Oh and I added a little pearl in the centre of each one.
Hands off! The eggs are mine!


My Spring card is a very simple design, definitely a "less is more" card. I used the Spring sampler stamps and layered the images using square punches and the postage stamp punch.

Wednesday, 27 March 2013

Gift bag with cards


This was a project that we made at Make. Do and Send card club recently.  The original idea came from Amanda Fowler, you can see her blog here. 
The little gift bag is made from just one piece of card which is scored using the fabulous Simply Scored board and then folded, it is held closed by ribbon. The bag is the perfect size to hold four 3x3 inch cards with their envelopes. I kept the decoration of my cards to a simple colour combination of Pool Party, Island Indigo and Calypso Coral, I shall be sorry to see these colours retire at the end of the current catalogue in June, do you think we can persuade stampin Up to keep them? 


Here's a closer image of the gift bag, you can see that I used the Mixed Bunch stamp set to decorate it.

Friday, 22 March 2013

Happy Birthday Alice!


Today my daughter turns 19, not long now before she's not a teenager anymore and ceases to know everything! 
I made this card while I was demonstrating at the Sandown craft show in January and as Alice loves butterflies, just like her grandma, I knew it would be perfect for her birthday.
The butterflies are stamped using the rock and roll technique and the mixed bunch stamp set. I punched them out with the matching punch and then removed two of the petals and 3d mounted them to make the butterfly wings. The background has been embossed with stripes.

Thursday, 21 March 2013

Patterned Occasions


I can't believe Saleabration is almost over for another year! There's still just time to order if you're quick though.  
Today's card shows off some more Saleabration goodies.  The stamp set is Patterned Occasions and the designer series paper, ribbon and buttons are all available with the current promotion too.

Monday, 18 March 2013

Bloomin Marvellous


As there are still a few days left of Saleabration I thought I would share a card made using one of the free stamp sets, Bloomin' Marvellous.  There are various versions of this design to be seen on pinterest, splitcoaststampers and other blogs. 
It's a lovely simple design but quite elegant I think and you can make it extra special by adding some pearls or rhinestones and some ribbon.

Sunday, 17 March 2013

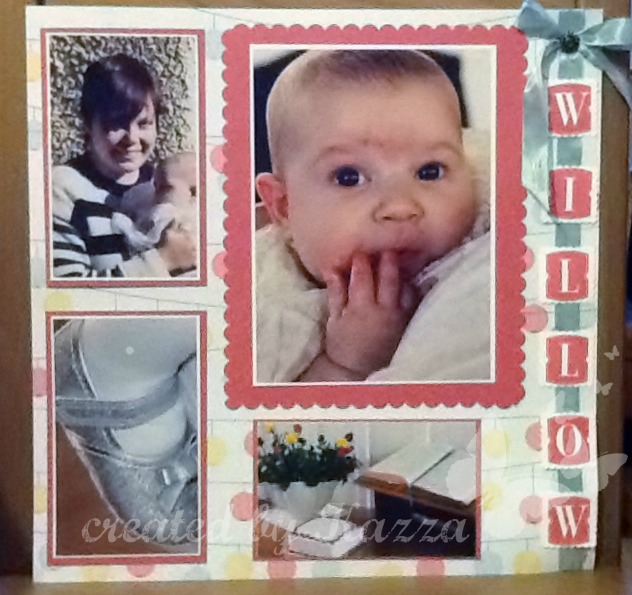
Willow's Naming Day

Oh goodness, how long since I posted here?!!  I'm afraid that life seems to have got in the way again, poor excuse I know.  It does mean however, that I have a lot of projects stored up to share with you and I will endeavour to do just that over the next few weeks.

Before I do though I just want to remind you that there are only a few days left of Saleabration 2013.  There are so many lovely products available to you this year and they can be earned FREE with a qualifying spend of £45 or by hosting a workshop/party.  Don't miss out!


Anyhow, onto a project!  A scrapbook page for a change.  This is a 12x12 page that I made to record the day of my niece's Naming Day last October.  The little lady herself takes pride of place but I also included a photo of my daughter, who is now Willow's godmother and a feature photo of her beautiful shoes.

Friday, 9 November 2012

Snowy Friends


I have another Christmas card to share today.  The snowmen were stamped and coloured with marker pens and mounted onto early espresso card.  The edge of the card has a scallop edge echoed on the base card.  A pretty bow completes the look.

Wednesday, 24 October 2012

Winter Memories

Once again I am in a Welsh hotel and I am getting excited as it is almost time for the Stampin Up convention in Mainz, Germany and I am busy making card fronts to swap with my fellow demonstrators.

I do have a card for you, Christmas again! :)


This stamp set, Winter Memories was one of the first to catch my eye from the Autumn and Winter seasonal catalogue.  I think the designs lend themselves perfectly to muted tones and watercolours and this is exactly what I have done with this lovely image of ice skates. Rather than watercolour I used a blender pen picking up the ink from the lid of my inkpads.  I stamped and coloured the image twice so that I could cut part of it out and 3d mount it.  Here's a closer look.


The dotty background paper is from the neutrals designer paper pattern stack and I added some dazzling details glitter for sparkle and some real red ribbon.

Wednesday, 26 September 2012

Four Seasons


This gorgeous stamp set will be available as a hostess benefit from October 1st as it appears in the brand new catalogue!  So exciting!!!!  It features four discs, one for each season of the year.  This card makes use of the winter snowflakes which has a cheeky robin nestling inside.  We made this card at team training earlier this month and used core-dinations card stock, embossed and sanded to reveal it's inner beauty, as a base then added the punched snowflake design, some ribbon and an additional snowflake hanging from the ribbon.


One of those cheeky robins has escaped to the inside of the card!

Tuesday, 25 September 2012

Sandown Make and Take Christmas card


Isn't this pretty? This is the card that Amanda designed for our Make and Take at the Sandown craft show.  We had six ladies at a time, all day making this lovely Christmas card.  
The colours are Bashful Blue, Marina Mist and Chocolate Chip. We used the ornament punch and the Delightful decorations stamp set and embellished with ribbon and pearls.

Monday, 24 September 2012

Stampin Up at the Sandown Show


This is what I was up to in my hotel room in Wales last week; I'm there again now but I will share what I am doing this week with you later.
Last weekend was the Sandown Stitches and Creative Crafts Show, Amanda had a stand there and I was going to help out for a couple of days.  Of course to really stand out from the crowd we needed LOTS of samples to decorate the walls so I said I would make some bunting to hang up.
This picture shows my work in progress and the ones below show how pretty my hotel room looked once I had hung it all up.  Well I wouldn't want to crush it would I? It was much safer up on the wall, I wonder what housekeeping thought!


I think our stand looked wonderful; some of the other ladies had made so many samples and worked so hard.  What do you think?


We were demonstrating and had make and take sessions running all day and we completely booked up very early on which was great. We were able to share Stampin Up with so many lovely people. I do have a picture of the card we made somewhere, I will find it for tomorrow for you.  Meanwhile, here is my bunting in situ!


Saturday, 25 August 2012

Another Christmas Gift box


Remember this?  It is a retake on the gift box that I made at team training last month but in a different colour scheme.  I used the traditional red and green of old olive and cherry cobbler together with the Holly Berry designer paper. See, I told you I would be making a lot of these!

Tuesday, 14 August 2012

Christmas Elf Boots!


How is this for a cheeky Christmas card?  A pair of stripy stockinged Elfen legs. I made this card at quarterly team training along with the gift box and I have a few more projects to share over the next few days so prepare to feel unseasonably Christmassy!
The shoes have each been made from a quarter of a top note die which was then shaped further using the ornament and circle punches, the shoes were then topped with a glimmer brad and a bow.  The gorgeous stripy stockings are from the Holly Berry designer papers and the greeting from Petite Pairs.

Sunday, 12 August 2012

Christmas Gift Box


I love this box!  The lovely Amanda Fowler showed us how at our recent team training day at the end of July.
The box itself is made from just one piece of A4 card stock and created easily using the Simply Scored. The lid is made from a scallop square cut using the Big Shot.  
The completed box stands around 6 inches high and will be perfect at Christmas time, I can see that I will be making a lot of these.

Tuesday, 24 July 2012

Completing the set


We have reached the end of our sea voyage with this card. Again this card looks so much more tricky to create than it is, simply layer the card and stamp on the top layer. Then, before adhering to the base card pop it inside the textured embossing folder and run through the Big Shot. Some ribbon and an antique brad and there you are :)

Sunday, 22 July 2012

More Open Sea


Another Open Sea card. This one uses the "negative" of the top note i.e. the piece of card that is left after you have cut out the top note shape. It makes a great window don't you think?
Related Posts Plugin for WordPress, Blogger...